
Here is a teardown of the Lepro GU10 LED Bulb RGBWW 385lm, with model number EAN902002-EU-4, the specifications are as follows:
- 3x Red, Blue and Green LEDs
- 8x Warm White LEDs (2700K)
- No cool white
- 4.5 watts, 385 lumens (or 350lm on the newest listing)
- 2.4 GHz Wifi
- 110 degree beam angle supposedly
- Works on "Tuya Smart" app
The included tuya firmware is buggy and has issues with home assistant such as poor latency and random disconnects, improved reliability is noted with the new firmware in my situation (especially over MQTT, web interface can be slow with poor signal).
This device in teardown is similar to another (https://www.elektroda.com/rtvforum/topic3934503.html#20289367) as it has mostly the same internals, but is different brand and slightly different features. I provide the tuya-cloudcutter device profile config (there isn't one already for version 1.3.20)
The model number is: EAN902002-EU-4, probably works for devices in other regions but I have not tested.
Packaging and listing:


It can be found on amazon for ~£6 per bulb when on discount.
Disassembly
Here is a picture of the unit I am tearing down:

First you start by prying off the top cover, I used a knife to penetrate the side of the bulb and worked it around the edge, dont worry about scratching the sides of the light cover as you wont see it. It comes out quite easily.

This reveals the LEDs and BP5758 LED driver shown below:

(be careful not to damage the LED driver, I have not been able to find a suitable replacement)
As you can see there is no cool white LEDs (labelled by C1, C2, ..., C8), you could probably solder this (I will give it a go at some point) with greater power usage it may be wise to limit the current to increase lifespan.
Maximum voltage is around 330 volts (on the HV pad), LEDs wired in series and it appears 7x ~35v rated LEDs and 1x ~16v on the warm white channel, they seem to be 0.5w per LED so roughly 90lm per watt LEDs, which seems reasonable.
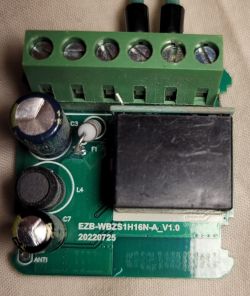
Then remove the board, careful as it is glued in, heat doesn't seem to help, I ended up drilling the edge of the board where there was no traces in order to make room for a screwdriver and it popped out with minimal damage.


The power supply board is the same as the device teardown linked above.

It uses BK7231N module, with EB01-B written on it.


Programming
Connecting to the MCU is done through the back of the module (3v3, GND, rx, tx), used an ft232 module on 3.3v mode, it must be desoldered to get adequate access to the pads without damaging the enclosure. Connect to flasher on the ports "RX1 and TX1 (programming port) are A1 and B1" taken from https://www.elektroda.pl/rtvforum/topic3923992.html.

I used bk7231flasher_1.1.6 (GUI executable) at 921600 baud to flash the module after backing up the existing firmware and config. Just select USB UART bridge com port and then chip type is "BK7231N". Select firmware and then run "Do backup and flash new".
After this, the module boots into a web GUI, configure module (look at json attached or image below), and run:

Also optionally adjust from 14 the default to something greater if feeling brave. Not sure what the original firmware uses, but there is diminishing returns past 30mA.
Flashing without opening the device (tuya-cloudcutter)
Luckily, the device is running a vulnerable version (1.3.20)
Please download tuya cloudcutter and follow instructions from this repo https://github.com/tuya-cloudcutter/tuya-cloudcutter
Must be run on linux (must be ubuntu), or ubuntu virtualised with wifi adapter passed through (e.g. USB).
After cloning the repo, make sure you have docker installed. If using arch or another distro it may require manually modifying the script (in my case I had to change "service networkmanger restart to systemctl restart NetworkManager" in "common.sh", but I would not recommend using a distro other than ubuntu)
I have not submitted my config so you will have to put the attached zip (Lepro-RGBWWGU10_EAN902002EU4-Ceiling-Light.zip, unzip the inner folder) into "device-profiles" under the project root directory.
Make sure to run as root, select "Flash 3rd party firmware", select "From device-profiles", then select "Lepro-RGBWWGU10.........", finally select OpenBeken. When asked to power cycle, do until slow flash or if device quick flashes, power cycle 6 more times.
Continue to follow the tuya-cloudcutter instructions. Should reboot into an AP where you tell it to connect to wifi, may require a few attempts as sometimes temperamental.
I successfully flashed 3 out of 3 devices using this method.
After this is done, you should have a working module without tuya firmware, setup MQTT, home assistant etc.
json config:
- 3x Red, Blue and Green LEDs
- 8x Warm White LEDs (2700K)
- No cool white
- 4.5 watts, 385 lumens (or 350lm on the newest listing)
- 2.4 GHz Wifi
- 110 degree beam angle supposedly
- Works on "Tuya Smart" app
The included tuya firmware is buggy and has issues with home assistant such as poor latency and random disconnects, improved reliability is noted with the new firmware in my situation (especially over MQTT, web interface can be slow with poor signal).
This device in teardown is similar to another (https://www.elektroda.com/rtvforum/topic3934503.html#20289367) as it has mostly the same internals, but is different brand and slightly different features. I provide the tuya-cloudcutter device profile config (there isn't one already for version 1.3.20)
The model number is: EAN902002-EU-4, probably works for devices in other regions but I have not tested.
Packaging and listing:


It can be found on amazon for ~£6 per bulb when on discount.
Disassembly
Here is a picture of the unit I am tearing down:

First you start by prying off the top cover, I used a knife to penetrate the side of the bulb and worked it around the edge, dont worry about scratching the sides of the light cover as you wont see it. It comes out quite easily.

This reveals the LEDs and BP5758 LED driver shown below:

(be careful not to damage the LED driver, I have not been able to find a suitable replacement)
As you can see there is no cool white LEDs (labelled by C1, C2, ..., C8), you could probably solder this (I will give it a go at some point) with greater power usage it may be wise to limit the current to increase lifespan.
Maximum voltage is around 330 volts (on the HV pad), LEDs wired in series and it appears 7x ~35v rated LEDs and 1x ~16v on the warm white channel, they seem to be 0.5w per LED so roughly 90lm per watt LEDs, which seems reasonable.
Then remove the board, careful as it is glued in, heat doesn't seem to help, I ended up drilling the edge of the board where there was no traces in order to make room for a screwdriver and it popped out with minimal damage.


The power supply board is the same as the device teardown linked above.

It uses BK7231N module, with EB01-B written on it.


ADVERTISEMENT
Programming
Connecting to the MCU is done through the back of the module (3v3, GND, rx, tx), used an ft232 module on 3.3v mode, it must be desoldered to get adequate access to the pads without damaging the enclosure. Connect to flasher on the ports "RX1 and TX1 (programming port) are A1 and B1" taken from https://www.elektroda.pl/rtvforum/topic3923992.html.

I used bk7231flasher_1.1.6 (GUI executable) at 921600 baud to flash the module after backing up the existing firmware and config. Just select USB UART bridge com port and then chip type is "BK7231N". Select firmware and then run "Do backup and flash new".
After this, the module boots into a web GUI, configure module (look at json attached or image below), and run:
BP5758D_Map 2 0 1 4 3
Also optionally adjust
BP5758D_Current 14 14Flashing without opening the device (tuya-cloudcutter)
Luckily, the device is running a vulnerable version (1.3.20)
Please download tuya cloudcutter and follow instructions from this repo https://github.com/tuya-cloudcutter/tuya-cloudcutter
Must be run on linux (must be ubuntu), or ubuntu virtualised with wifi adapter passed through (e.g. USB).
After cloning the repo, make sure you have docker installed. If using arch or another distro it may require manually modifying the script (in my case I had to change "service networkmanger restart to systemctl restart NetworkManager" in "common.sh", but I would not recommend using a distro other than ubuntu)
git clone https://github.com/tuya-cloudcutter/tuya-cloudcutter.gitI have not submitted my config so you will have to put the attached zip (Lepro-RGBWWGU10_EAN902002EU4-Ceiling-Light.zip, unzip the inner folder) into "device-profiles" under the project root directory.
Make sure to run as root, select "Flash 3rd party firmware", select "From device-profiles", then select "Lepro-RGBWWGU10.........", finally select OpenBeken. When asked to power cycle, do until slow flash or if device quick flashes, power cycle 6 more times.
Continue to follow the tuya-cloudcutter instructions. Should reboot into an AP where you tell it to connect to wifi, may require a few attempts as sometimes temperamental.
I successfully flashed 3 out of 3 devices using this method.
After this is done, you should have a working module without tuya firmware, setup MQTT, home assistant etc.
json config:
Code: JSON
Cool? Ranking DIY

