
Hello, here I present a teardown of the Lenovo Smart LED Lightstrip, this is the 2 meter version, model number SE-243SC. It is currently $8 on Lenovo's website.
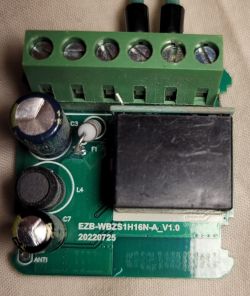
This uses a BK7231T, specifically a WB3S.
![[BK7231T] Lenovo Smart LED Lightstrip SE-243SC RGBWW](https://obrazki.elektroda.pl/4489923600_1671076661_thumb.jpg "[BK7231T] Lenovo Smart LED Lightstrip SE-243SC RGBWW")
![[BK7231T] Lenovo Smart LED Lightstrip SE-243SC RGBWW](https://obrazki.elektroda.pl/7442697000_1671076670_thumb.jpg "[BK7231T] Lenovo Smart LED Lightstrip SE-243SC RGBWW")
![[BK7231T] Lenovo Smart LED Lightstrip SE-243SC RGBWW](https://obrazki.elektroda.pl/1484193900_1671076676_thumb.jpg "[BK7231T] Lenovo Smart LED Lightstrip SE-243SC RGBWW")
![[BK7231T] Lenovo Smart LED Lightstrip SE-243SC RGBWW](https://obrazki.elektroda.pl/2079130900_1671076680_thumb.jpg "[BK7231T] Lenovo Smart LED Lightstrip SE-243SC RGBWW")
![[BK7231T] Lenovo Smart LED Lightstrip SE-243SC RGBWW](https://obrazki.elektroda.pl/4324023500_1671079383_thumb.jpg "[BK7231T] Lenovo Smart LED Lightstrip SE-243SC RGBWW")
![[BK7231T] Lenovo Smart LED Lightstrip SE-243SC RGBWW](https://obrazki.elektroda.pl/1144822100_1671079387_thumb.jpg "[BK7231T] Lenovo Smart LED Lightstrip SE-243SC RGBWW")
Opening the controller: the housing is constructed kind of badly which allows you to pry the housing apart along the seam running down the middle. Insert a metal pry tool where either cable enters the housing and you can easily pry it apart.
![[BK7231T] Lenovo Smart LED Lightstrip SE-243SC RGBWW](https://obrazki.elektroda.pl/2216360200_1671076733_thumb.jpg "[BK7231T] Lenovo Smart LED Lightstrip SE-243SC RGBWW")
The board is held in by these two clips, you can pull both sides of the plastic apart to remove the board.
![[BK7231T] Lenovo Smart LED Lightstrip SE-243SC RGBWW](https://obrazki.elektroda.pl/2452284000_1671076764_thumb.jpg "[BK7231T] Lenovo Smart LED Lightstrip SE-243SC RGBWW")
![[BK7231T] Lenovo Smart LED Lightstrip SE-243SC RGBWW](https://obrazki.elektroda.pl/4483324500_1671076771_thumb.jpg "[BK7231T] Lenovo Smart LED Lightstrip SE-243SC RGBWW")
The insides:
![[BK7231T] Lenovo Smart LED Lightstrip SE-243SC RGBWW](https://obrazki.elektroda.pl/3550110000_1671076984_thumb.jpg "[BK7231T] Lenovo Smart LED Lightstrip SE-243SC RGBWW")
![[BK7231T] Lenovo Smart LED Lightstrip SE-243SC RGBWW](https://obrazki.elektroda.pl/1782671500_1671076988_thumb.jpg "[BK7231T] Lenovo Smart LED Lightstrip SE-243SC RGBWW")
Installing OpenBeken:
Solder wires to the WB3S, connect to a UART and then follow the flashing instructions. Hold a wire connecting CEN to GND to get the chip into flashing mode.
![[BK7231T] Lenovo Smart LED Lightstrip SE-243SC RGBWW](https://obrazki.elektroda.pl/7158904500_1671077078_thumb.jpg "[BK7231T] Lenovo Smart LED Lightstrip SE-243SC RGBWW")
Pin config:
* P6: PWM, channel 4
* P8: PWM, channel 5
* P9: PWM, channel 1
* P14: Button
* P24: PWM, channel 2
* P26: PWM, channel 3
This uses a BK7231T, specifically a WB3S.
![[BK7231T] Lenovo Smart LED Lightstrip SE-243SC RGBWW](https://obrazki.elektroda.pl/4489923600_1671076661.png "[BK7231T] Lenovo Smart LED Lightstrip SE-243SC RGBWW")
![[BK7231T] Lenovo Smart LED Lightstrip SE-243SC RGBWW](https://obrazki.elektroda.pl/7442697000_1671076670.png "[BK7231T] Lenovo Smart LED Lightstrip SE-243SC RGBWW")
![[BK7231T] Lenovo Smart LED Lightstrip SE-243SC RGBWW](https://obrazki.elektroda.pl/1484193900_1671076676.png "[BK7231T] Lenovo Smart LED Lightstrip SE-243SC RGBWW")
![[BK7231T] Lenovo Smart LED Lightstrip SE-243SC RGBWW](https://obrazki.elektroda.pl/2079130900_1671076680.png "[BK7231T] Lenovo Smart LED Lightstrip SE-243SC RGBWW")
![[BK7231T] Lenovo Smart LED Lightstrip SE-243SC RGBWW](https://obrazki.elektroda.pl/4324023500_1671079383.png "[BK7231T] Lenovo Smart LED Lightstrip SE-243SC RGBWW")
![[BK7231T] Lenovo Smart LED Lightstrip SE-243SC RGBWW](https://obrazki.elektroda.pl/1144822100_1671079387.png "[BK7231T] Lenovo Smart LED Lightstrip SE-243SC RGBWW")
Opening the controller: the housing is constructed kind of badly which allows you to pry the housing apart along the seam running down the middle. Insert a metal pry tool where either cable enters the housing and you can easily pry it apart.
![[BK7231T] Lenovo Smart LED Lightstrip SE-243SC RGBWW](https://obrazki.elektroda.pl/2216360200_1671076733.png "[BK7231T] Lenovo Smart LED Lightstrip SE-243SC RGBWW")
The board is held in by these two clips, you can pull both sides of the plastic apart to remove the board.
![[BK7231T] Lenovo Smart LED Lightstrip SE-243SC RGBWW](https://obrazki.elektroda.pl/2452284000_1671076764.png "[BK7231T] Lenovo Smart LED Lightstrip SE-243SC RGBWW")
![[BK7231T] Lenovo Smart LED Lightstrip SE-243SC RGBWW](https://obrazki.elektroda.pl/4483324500_1671076771.png "[BK7231T] Lenovo Smart LED Lightstrip SE-243SC RGBWW")
The insides:
![[BK7231T] Lenovo Smart LED Lightstrip SE-243SC RGBWW](https://obrazki.elektroda.pl/3550110000_1671076984.png "[BK7231T] Lenovo Smart LED Lightstrip SE-243SC RGBWW")
![[BK7231T] Lenovo Smart LED Lightstrip SE-243SC RGBWW](https://obrazki.elektroda.pl/1782671500_1671076988.png "[BK7231T] Lenovo Smart LED Lightstrip SE-243SC RGBWW")
Installing OpenBeken:
Solder wires to the WB3S, connect to a UART and then follow the flashing instructions. Hold a wire connecting CEN to GND to get the chip into flashing mode.
![[BK7231T] Lenovo Smart LED Lightstrip SE-243SC RGBWW](https://obrazki.elektroda.pl/7158904500_1671077078.png "[BK7231T] Lenovo Smart LED Lightstrip SE-243SC RGBWW")
Pin config:
* P6: PWM, channel 4
* P8: PWM, channel 5
* P9: PWM, channel 1
* P14: Button
* P24: PWM, channel 2
* P26: PWM, channel 3
Cool? Ranking DIY
![[BK7231T] Lenovo Smart LED Lightstrip SE-243SC RGBWW](https://obrazki.elektroda.pl/1532597100_1671101321.png "[BK7231T] Lenovo Smart LED Lightstrip SE-243SC RGBWW")
![[BK7231T] Lenovo Smart LED Lightstrip SE-243SC RGBWW](https://obrazki.elektroda.pl/1305446000_1671101606.png "[BK7231T] Lenovo Smart LED Lightstrip SE-243SC RGBWW")